
Whole Wheat Pie Crust Recipe
This post may contain affiliate links. If you make a purchase through links on this site, I may earn a commission.
Read my Privacy Policy.
This whole wheat pie crust recipe is a very simple recipe to make. It comes together quickly and there are only about a million different things you can do with it.
Since this is a basic dough, there are tons of things you can make with it. If you will be making a pie, you could add cinnamon or another complementary spice to the dough, and use olive or safflower oil.
If you are making something savory, like the Pesto Quiche With Sun Dried Tomatoes I made a little while back, then try mixing in some Italian spice or garlic into the dough, and use olive oil.
Pie crust doesn’t have to be boring. You just have to get creative. But stay light on the spices so they don’t overpower what you are filling the crust with! About 1/2 tsp. per batch of dough. This extra spice should compliment the finished dish, not overwhelm it.
The great thing about pie crusts is once they are filled, you can pretty much freeze any recipe you’ve made to keep on hand for one of those busy work nights. Or, just freeze the dough in the pie tin if you prefer a more “fresh” approach. Fill it last minute, pop it in the oven, and you’ve got a quick meal any day of the week!
What Pie Filling Goes Well With This Crust?
This is truly an all-purpose crust. It’s versatile and will hold just about anything. Because it’s not a butter crust, the texture is more of a crumby crust than a flaky crust. But it makes super delicious pies just the same, and it’s a perfect pie crust for quiches as well. Avoid the urge to add butter, shortening, or lard. It won’t work well with this recipe.
So what can you put in this? Here are some suggestions:
- Apple pie
- Blueberry pie
- Pecan pie
- Peanut Butter Pie
- Quiche
- Cherry pie
- Raspberry pie
- Pumpkin pie
- Cranberry pie
- Banana cream pie
- Chocolate cream pie
- Coconut meringue pie
- Fresh strawberry pie
Vegan Pie Crust Recipe
If you want to turn this into a vegan pie crust, it’s super easy! I’ve made it both ways and it turns out super well either way. Simply substitute the regular milk for unsweetened almond milk and you’re good to go!
Should You Cook This Pie Crust Before Filling It?
Generally speaking, it’s a good idea to do so. It may not need it for some recipes, but for most, it’s a good idea so that the bottom of the crust doesn’t stay soggy under a wet filling. You can even use pie weights if you wish, though I have never found them to be necessary with this recipe.
To Bake This Crust
Preheat the oven to 350 F. Bake the crust for 10-15 minutes, or until you see a change in color. It won’t get golden brown in just those few minutes, but that’s okay. Just bake it until the middle seems at least mostly cooked if not fully cooked. The timing can vary by oven.
How Many Pie Crusts Does This Recipe Make?
In general, this recipe will make approximately two 8 or 9-inch pie crusts. You may have a little dough left over. I usually make a small hand pie out of any leftovers.
Can I Make This Dough In A Stand Mixer Or Food Processor?
Stand Mixer – You can absolutely blend this in a stand mixer using a dough hook.
Food Processor – If your food processor comes with a dough hook, then you can use that too. If it doesn’t, I would avoid it. Simply place everything in the bowl of a food processor with the proper attachment and mix.
About The Ingredients
Whole wheat pastry flour – Plus extra on reserve. Regular whole wheat flour is too dense for this recipe, and all-purpose flour is not clean. If you cannot find the pastry version, then look for “white whole wheat flour”. It’s the next best thing after whole wheat pastry flour, and it’s more readily available in most places.
Salt – I used pink Himalayan salt, but you can use whatever salt you normally bake or cook with. Fine sea salt or kosher salt works well.
Oil – I usually use liquid coconut oil. But any light-flavored oil will work.
Milk – Any type except coconut milk – it’s too thick.
How To Make Whole Wheat Pie Crust
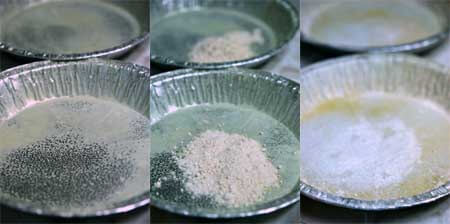
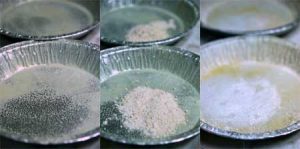
First, prepare your pie tins. Spray your tin with a coat of spray-on oil from an oil sprayer, or use your fingers or a paper towel to spread the oil over the pan.Add about ⅛ cup whole wheat pastry flour to your tin from your reserve flour (not from the 2¾ cups for the crust)Shake your tin around until the flour completely coats the surface of the pie pan. Then set it aside.Next, make the dough.
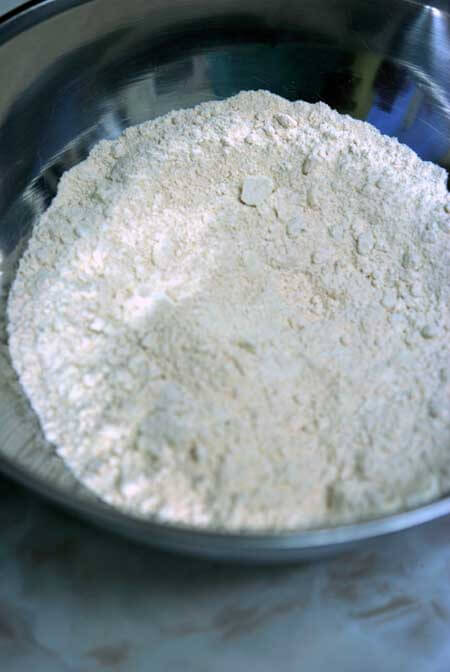
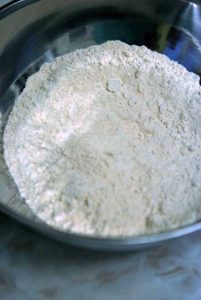
Put flour and salt into a mixing bowl and mix.

Measure your milk and oil into the same cup.
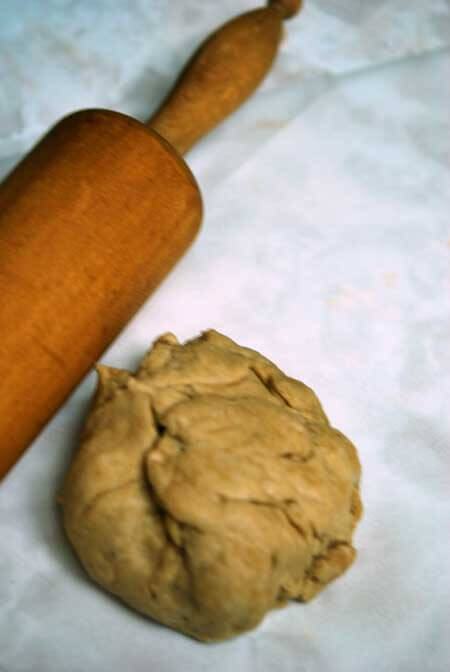
Knead the mixture well, by hand, until you have a firm dough. It takes some doing, so don’t give up.
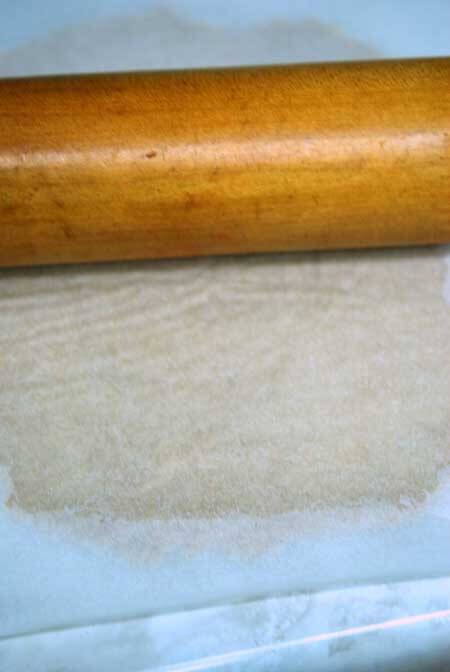
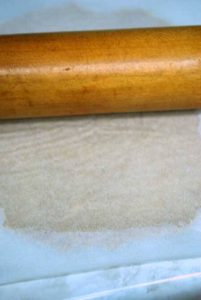
Place your dough on a large piece of parchment paper. Flatten slightly with your hands or rolling pin, and then place another large sheet of parchment paper over the top so the dough is sandwiched in between. Roll with your rolling pin until your dough is about ⅛ inch to ¼ inch thick.
You may need to lift the parchment occasionally or flip the whole thing over to get rid of wrinkles in the parchment. Remove the top sheet of parchment, and roll out any wrinkles left in the dough by the parchment. You should have a nice, even, and smooth piece of dough. Divide your dough in half.
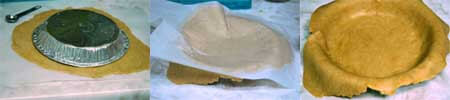
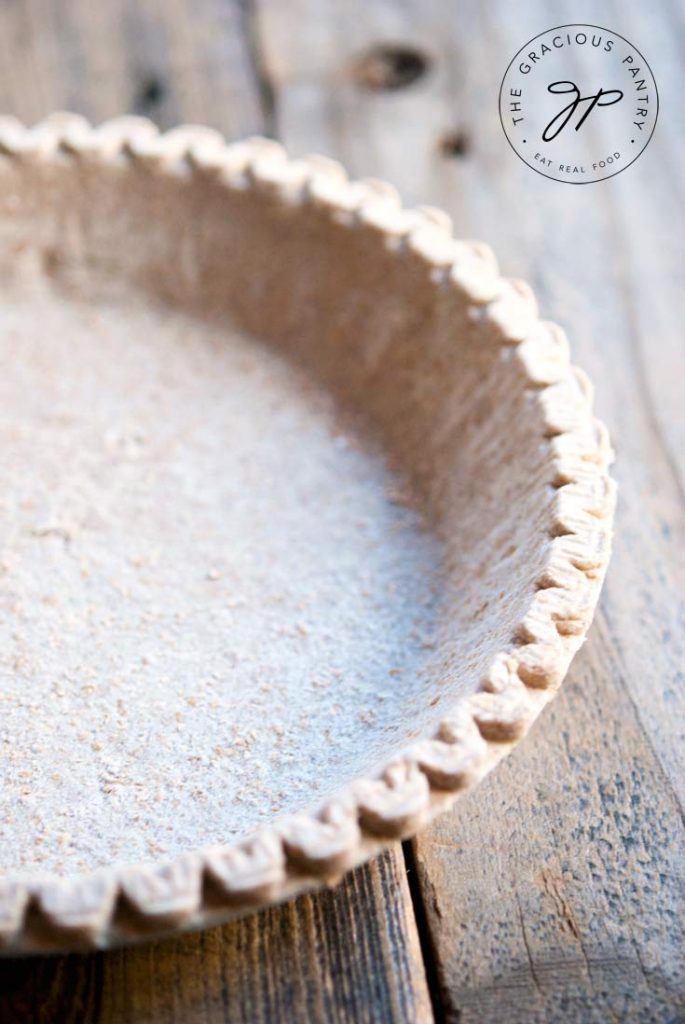
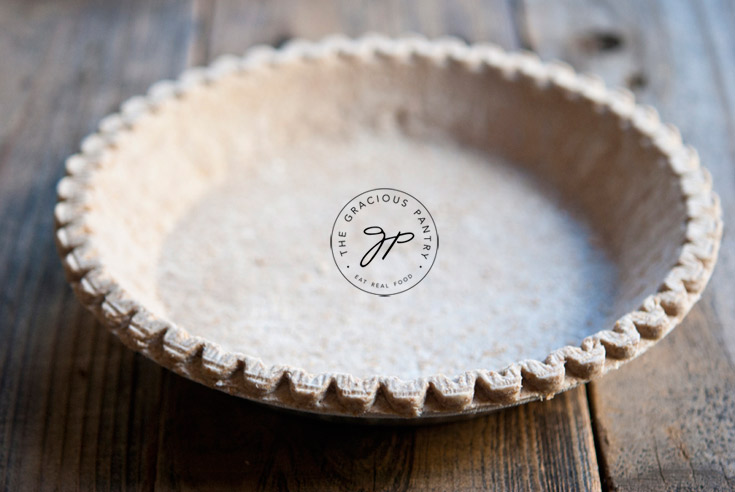
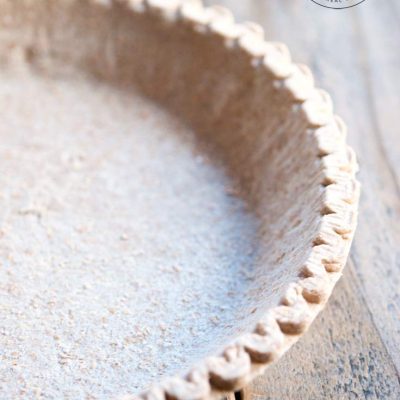
Place your tin upside down on your dough. Flip the whole thing over, and mold the dough into your tin, being careful not to rip the dough.
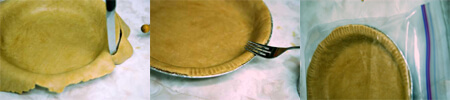
Cut the excess dough around the edge of the pan. Keep your knife upright so you get a nice even cut. Crimp with a fork, and then place the whole thing in a large zip lock bag. Place in the freezer and you’ve got whole wheat Pie Crust any time you need it!
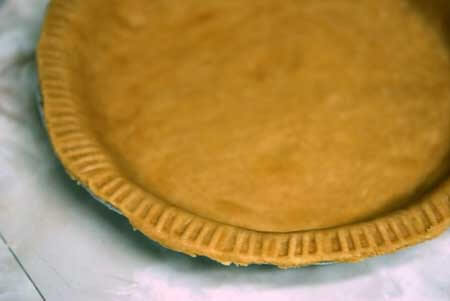
Ta-da! The finished pie crust.
How To Store Whole Wheat Pie Crust
This will keep in the fridge for up to 3 days if packed well. After that, you’ll want to freeze it. In either case, wrap it well. I usually store mine in a zipper-top food storage bag that I press air out of before zipping it up. If you make multiple crusts, you can freeze them stacked if you wish, but put a piece of parchment or plastic wrap between them.
Recipe Supplies
For this recipe, you’ll need a standard pie pan, a rolling pin, and a mixing bowl. You can click on any of the images here to be taken to that product on Amazon. (Affiliate links)


Holiday Pie Recipes
Whole Wheat Pie Crust Recipe Card

Adapted from a recipe found on AllRecipes that no longer exists on their site.
Whole Wheat Pie Crust Recipe
Equipment
- Standard pie pan
Ingredients
- 2¾ cups whole wheat pastry flour (affiliate link) plus extra on reserve
- 1 tsp. salt
- ½ cup oil
- ½ cup milk (any type except coconut milk – it’s too thick)
Instructions
- First, prepare your pie tins.Spray your tin with a coat of spray-on oil from an oil sprayer, or use your fingers or a paper towel to spread the oil over the pan.Add about ⅛ cup whole wheat pastry flour to your tin from your reserve flour (not from the 2¾ cups for the crust)Shake your tin around until the flour completely coats the surface of the pie pan. Then set it aside.Next, make the dough.

- Put flour and salt into a mixing bowl and mix.

- Measure your milk and oil into the same cup.

- Mix well by hand until you have a firm dough. It takes some doing, so don’t give up.
- Place your dough on a large piece of parchment paper. Flatten slightly with your hands or rolling pin, and then place another large sheet of parchment paper over the top so the dough is sandwiched in between. Roll with your rolling pin until your dough is about ⅛ inch to ¼ inch thick. You may need to lift the parchment occasionally or flip the whole thing over to get rid of wrinkles in the parchment.Remove the top sheet of parchment, and roll out any wrinkles left in the dough by the parchment. You should have a nice, even, and smooth piece of dough. Divide your dough in half.
- Place your tin upside down on your dough. Flip the whole thing over, and mold the dough into your tin, being careful not to rip the dough.

- Cut the excess dough around the edge of the pan. Keep your knife upright so you get a nice even cut. Crimp with a fork, and then place the whole thing in a large zip lock bag. Place in the freezer and you’ve got whole wheat Pie Crust any time you need it!
- Ta da!


I made the dough last night and plan to make an apple pie after going apple picking today. Thanks for confirming coconut oil worked. I used safflower, but thought about using coconut. Can’t wait to make the pie.
Laurie – Let me know how the pie turns out! 🙂
So I made the crust. It was very tough and difficult to roll out, so I added more almond milk. It tasted great, though more like shortbread than pie dough. Lo and behold, I realized I had only used a quarter cup of milk rather than 3/4 cup. D’oh. I don’t know the last time I did something like that. It tasted great with the apple pie, just not a pie crust. Will make again with the right amount of milk. I also added some cinnamon to the dough which was nice.
For the pie fillingn, I adapted a recipe that users cream, brown sugar, vanilla and cinnamon to pilot over the apples. I used fat free half and half with no discernible difference. I also made a small ramekin using almond milk. I thought it was pretty decent. My son (almost 12) gave it a 7.75. My boyfriend thought it was ok. He thought it tasted too flowery. It’s funny because I assumed he meant flour-y. Took a few minutes to get on the same page.
Anyway, I think I’m going to make your apple pumpkin muffins. Went apple picking yesterday. I may do a different recipe though because I’ve baked with pumpkin the past two weekends.
Laurie – Ya, if you change a recipe a lot, it’s always a gamble. But glad it all worked out!
Yah. Except I didn’t meant to change it!
Laurie – Oh! Oops!
For what it’s worth, my boyfriend liked it. And, I didn’t realize the mistake til later. Asi said, it tasted like shortbread which is yummy in its own right. I am really enjoying your blog. I’ve been a fanatical baker for years (since my son was born almost 12 years ago), but hadn’t baked much since trying to eat healthier (it’s that turning 45 thing). I missed baking and needed it to balance my crazy life as a divorced mom and working 50 or so hours a week. I’m now hooked on baking clean. I gave my personal trainer a muffin I made this morning and she loved it! The trainer is my 2x week treat to myself!
Laurie – Good for you!! I hope the next attempt at the crust goes more to plan.
Would sifted whole wheat flour or oat flour work? And is coconut oil a good oil for this?
Elizabeth – It will work, but the result will still be a little more coarse/dense. Coconut oil should be fine, but you’ll have to work it in a bit more with your hands.
I’m not sure if this is what the previous comment is about so I’m going to ask anyways. The difference between pastry flour and all purpose flour. I would like to make this today but only have all purpose and would rather not have to go to the store.
Britne – If you want to eat clean, neither will work. If your goal is clean eating, you need WHOLE WHEAT pastry flour. All purpose is very processed. That being said, if they are made from two different types of wheat. They have different amounts of gluten in them, and the pastry variety has a finer “grind”.
It is whole wheat. I figured all purpose can be any type, it just means that it can be used for anything guess I was wrong. i found a conversion chart from “normal” to “pastry” that says to just use a TBS less per cup. will this work?
Britne – Sure. I’ve always just used equal amounts, but you can always start with the smaller amount and add the extra tbsp. if you feel you need it.
I think I’m the only one who noticed that the ingredients list calls for 3/4 cup of milk, but the photo in the.directions show 1/2 cup… Which is it?
Lauren – Thanks for noticing! I think I may have adjusted it at some point, but I am making them again this weekend, so I’ll double check. For now, I do know the photo is correct, so stick with the 1/2 cup. Just use the extra 1/4 cup if needed for a good dough.
Hi Tiffany!
I’ve made many of your recipes and have even modified some and have to say, I’ve loved every single one!
I’ve made this one twice now, used for a quiche and as a layering desert in place of phylo (lol, it was interested, but still very tasty)… so sweet & savory, very basic & versatile.
As I gear up for the holiday, I’m wondering if I may prepare this a day ahead and store the crust in the ziploc in the fridge, but not freeze… would this work or should I just freeze it anyway and let it thaw the next day? Just wanted to save time on the thawing process if possible.
Many thanks in advance!
Stephanie – So glad you’re enjoying my recipes! 🙂 Yes, this will be fine in the fridge for one day. But it will be very soft, so handle with care. Enjoy!
Do you think I could be bold and try subbing the oil for applesauce? I know it works in most pastries, but I’m not sure about this.
Kara – Possibly. Pie crust is pretty forgiving. Worth a shot! But I would have a backup plan just in case…
Hi,
I tried this and it only filledo ut one pie pan for me. What could I have done wrong? Also, I sprinkled cinnamon on it but it was still bland. What are your thoughts about adding honey and cinnamon to make it sweeter?
Kiran – You can certainly add honey if you like, but it will make the dough stickier and harder to work with, so you’ll have to play it by ear on that one. But really, pie crust never has much flavor. It’s all about what you fill it with. I would guess that you either didn’t roll it thin enough, or something got measured incorrectly. I made this same recipe last night and it definitely makes enough for 2 crusts. How much milk did you add?
It was my first time ever attempting pie crust. I believe I followed directions to the “t” but I will attempt it later this month again and report back to you. Thank you for reading and responding. I am a HUGE fan of your site.
Kiran – Thanks! And yes please, let me know how it goes.
What is the difference between whole wheat pastry flour and whole wheat flour?
Could I use the whole wheat flour instead?
Whitney – Here’s an article I did on that: https://www.thegraciouspantry.com/clean-eating-flour/
Hi there, this looks like a great recipe. I’m actually in the middle of making it right now and because I couldn’t find the pastry flour I used the regular whole wheat instead. The only problem is that’s not forming a dough AT ALL. It looks like a graham cracker crust right now. I already added 1/4 cup more liquid but don’t know what else to do. Any suggestions or should I just bake as is and hope for the best? Thanks.
Keri – the regular stuff will soak up more liquid. So add more liquid for sure. The thing is, when you do, you also have to knead the dough for a long time to really incorporate it. It’s easy to add too much if you don’t.
The dough seems really crumbly and as if it lacks moisture…I added some water but I’m still not sure if it will hold as a single piece when I roll it into a circular shape. Thanks!
Rachael – Did everything get measured correctly? You can always add a little extra oil or milk too. It should be a dense but workable dough.
Is the salt really important or can it be left out?
Patty – You can leave it out. 🙂