
Simple Dutch Oven Bread
This post may contain affiliate links. If you make a purchase through links on this site, I may earn a commission.
Read my Privacy Policy.
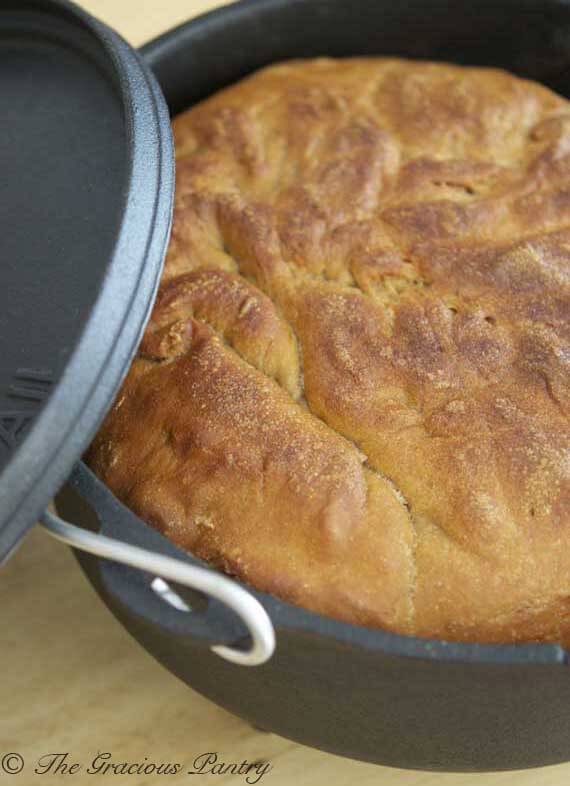
This simple dutch oven bread is easy to make and requires very little effort on your part.
A while back, I was on Facebook (~gasp!~) and I came across a post from another web site that was for a no-knead bread. What got my attention was the pretty photo of the loaf in a dutch oven. I’m a sucker for pretty food photos. What can I say…
So I clicked through to the site and read the post. In it, the author talks about how she got the recipes from a particular book and how it’s consistently the best bread she’s ever had. But what really got my attention was the fact that she broke down the price per loaf.
People are always asking me about ways to eat clean on a budget, and this loaf was apparently only .74 cents to make! Now if that’s not budget bread, I don’t know what is! And even better was the amount of work involved in making it. Almost none!
So when I shared the link on my own Facebook page, I mentioned that you could easily just swap out the white flour for whole wheat flour. But what I failed to remember is that whole wheat flour always needs more liquid than white flour. So I got busy and tried the recipe myself.
My first attempt looked more like a pancake. So I went back and read some of the comments and read that somebody had added vital wheat gluten. Bells went off in my head and I somehow managed to find my lost bag of vital wheat gluten in under 10 minutes. So I started the whole process over again, making some necessary adjustments this time.
I tried a piece after it cooled down and I have to say that by itself, it’s not the most wonderful bread I’ve ever had. However, with something on it, it’s pretty darn good. It’s one of those breads that really lets the flavors of whatever you put on it come through. In fact, I think this bread would be a wonderful bread to make with flavorful additions such as cinnamon and raisins or even some Italian Herb spice.
Whole grain, 5 ingredients, quick and easy to make, totally affordable, and very light and chewy yet fluffy. There’s just no way to beat that.
So here are the adjustments I made to the original author’s recipes. I should mention that I used a 4-quart dutch oven for this. You could get away with going just a quart or so bigger, but I wouldn’t make this in a dutch oven any smaller than that. Or if you do, make two loaves.
Also, I encourage you to visit the link mentioned above as she has some great process photos that really do help.
More Healthy Bread Recipes
Simple Dutch Oven Bread Recipe Card

Simple Dutch Oven Bread
Equipment
- 1 Dutch Oven
Ingredients
- 5⅔ cups white whole wheat flour + some for flouring the risen dough
- ⅓ cup vital wheat gluten
- ½ tsp. instant or active-dry yeast
- 2½ tsp. salt
- 1⅔ cups cool water (I used room temp)
Instructions
- In a large mixing bowl, whisk together the dry ingredients.
- Pour in the water and stir the dough with a wooden spoon until well combined. It will be a wet and sticky dough.
- Cover the bowl with plastic wrap and leave in a warm kitchen for 12-18 hours or until the dough is nice and bubbly. (yup, just mix, cover and walk away. Easy, right?)
- 12 to 18 hours later, come back and get your bag of flour out again. I found it easiest to flour my counter top and dump the dough out onto it. Then sprinkle some flour over the top. Pick up the floured dough and start folding it under to form a nice round loaf. Use flour liberally so the dough doesn’t stick to your hands.
- Here’s where my instructions differ from hers and start following the comments on her recipe. I took a large piece of parchment paper and pressed it down into my dutch oven so that it lined the bottom of pot. I them placed the dough in the dutch oven and tucked another piece of parchment gently over the top. I put the lid on the oven and let the dough rise the second time in the dutch oven for 2 hours.
- Remove the dough from the dutch oven by lifting it out by the parchment paper.
- Heat your oven to 425 F. WITH THE DUTCH OVEN INSIDE for about 20 minutes. You want that dutch oven to be hot when you put the dough in.
- Carefully remove the dutch oven from the hot oven (please use pot holders, these dutch ovens get super hot, especially if you have a cast iron one like I do!) and set it on your stove top or other heat-safe surface.
- “Pour” the dough into the dutch oven. It may stick a little to the parchment, but just scrape gently and it will all come off. You should hear the dough sizzle in the pot.
- Using thick pot holders, put the lid back on the dutch oven and place the whole thing in the oven for about 50 minutes. In the last 5-10 minutes of baking, remove the lid so the top of your bread can brown nicely.
- Using thick pot holders, remove the dutch oven from the oven and place on a heat-safe surface. Using a metal spatula or other heat-safe utensil, lift the bread out of the dutch oven. Don’t burn yourself!
- Place the bread on a cooling rack and allow to cool almost completely before slicing.
Notes
Nutrition
If you don’t have a dutch oven, what do you recommend baking this in? Or does it have to be a dutch oven? Thanks!
To be honest, I don’t know. This is the first time I’ve used a dutch oven and I don’t know if it’s any different than just using a baking dish. You might want to to got the web site of the original recipe and ask there. She could tell you better than I can.
are you sure it isn’t 2 2/3 c water? Very dry, had to add more water.
It could be different at different altitudes or in different weather. If you feel it needs more water, feel free to add it. Just don’t overdo it.
may I ask, why the parchment paper instead of the cotton towel?
I didn’t have the cotton towel. Plus, the parchment was less messy.
Oh gosh thank you so much for this recipe! I saw that same post for the no knead bread the other day and decided to make a clean version of it myself and it came out pretty much like a really stiff brick of bread! Silly me! But I’m so happy you posted this so I can try it again, it looks like it would be great for soups and sandwiches. ^_^
Ya! It’s great for sandwiches! Enjoy!
I didn’t have a problem at all and I made it twice.
Yes.
Glad you enjoyed it!
I believe so, but I’ve never tried.
I’m assuming the Dutch Oven Bread is cooked in a “seasoned” cast iron?
Pat – I’m not sure. This was the first time I’ve done it. My cast iron pans need seasoning, so I would imagine that it would be best for a dutch oven as well.
Hi! I was wondering, I am currently trying to find the best foods for my family to eat and researching like a mad-woman, but I was curious, what is vital wheat gluten and why is it “vital” since it seems like so many people are going to a gluten-free diet? I was not even aware you could buy a bag of gluten until I started researching gluten-free products. BTW, I really don’t think I can do the gluten-free thing. lol
Sarah – In and of itself, gluten is a natural part of wheat. Yes you can buy it separately, but I’m not sure why they attach the word “vital” to it. That would be a question for the company that sells it or perhaps the explanation is on their web site somewhere. While there are many varied opinions about gluten and whether it’s bad or not for you, I personally would only avoid it if you have an issue with gluten. There are tons of people that feel that nobody should eat gluten, and they make a lot of valid points. So it really depends on what you feel is right for you and your family.
I make something very similar to this, except with sourdough starter (it provides the yeast, and the overnight period lets the dough ferment some.) The parts that I do that might help here are: I let the dough do its second rise in a bowl about the same size/ shape as the dutch oven, seam side down and with a coating of corn meal so I can just flip it into the oven – that way I don’t forget to have the dutch oven in the big oven for the preheat – you don’t want to thermal shock the dutch oven! The corn meal keeps it from sticking to the bowl or the oven (I give it a little shake when I first dump it in, too. Having the bread cook covered keeps moisture in so the crust stretches nicely and is thick and chewy. Yum! One of my favorite ways to do sourdough. 🙂
Steph – Thanks for the tips!
I have a stainless steel dutch oven. Do you think the bread will stick?
Brandy – Most likely. But you could cut a circle of parchment to fit the bottom of the dutch oven. Then just run a knife around the edge of it when it’s done baking. A soak will get any residual stuff off the dutch oven. Let me know how it goes if you try it!
I just bought a sous vide and an instant pot. I think my husband will kill me if I show up in a Williams Sonoma again for a $300 (or worse) cast iron dutch oven. LOL I’m gonna have to give it a try in my stainless steel or tri-clad and see how it works. You’ve kinda skerred me about that meh taste of it. Should I go ahead and add some herbs de province or something first go around and how much would you suggest?
Jennifer – A dutch oven shouldn’t cost that much. I think mine was $20-$30. But if you are concerned, you can certainly add some spices. Totally up to you and what you like in your bread. A little garlic and onion powder might be nice too.