
Whole Wheat Irish Soda Bread Recipe
This post may contain affiliate links. If you make a purchase through links on this site, I may earn a commission.
Read my Privacy Policy.
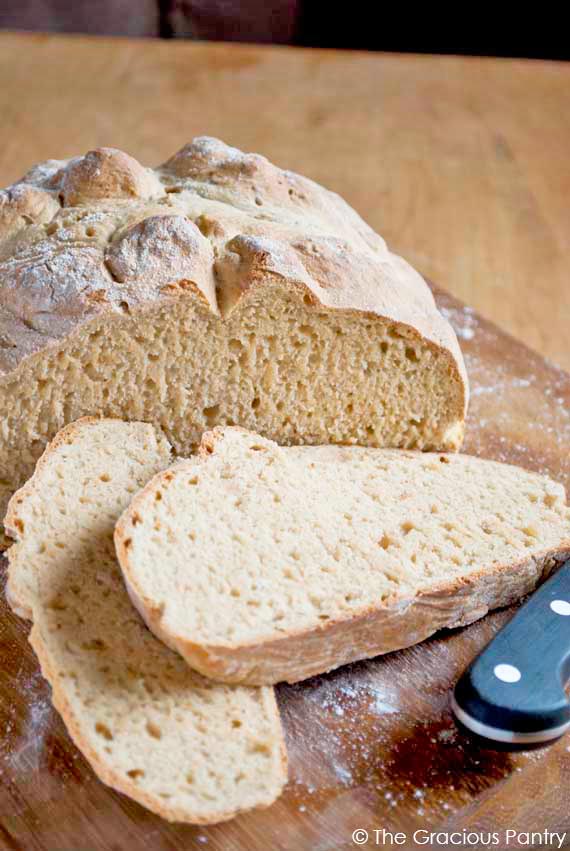
This whole wheat Irish soda bread is a fabulous bread that is easy to make with minimal steps or ingredients. It’s a great bread recipe for all you non-bread bakers out there.
My mom recently went on a trip to Ireland. She has never really gone anywhere, so this was the trip of a lifetime for her. She loved every second of it and is now talking about buying a vacation house over there.
To say she came back inspired by Irish cooking is an understatement.
The other night, she made me some Irish Soda Bread using a recipe from an Irish website she found, and I was hooked. It was straight out of the oven, and she had put a little bit of Irish butter on it to boot. Kerry butter, anyone?
The History Of Irish Soda Bread
Irish Soda Bread actually has an interesting history.
This type of bread was first create by the Native American Indians.
“They were the first to be documented using pearl ash, a natural form of soda formed from the ashes of wood, to leaven their bread without yeast.
The Irish later discovered and replicated the process. While it seems like an ancient recipe, Irish soda bread history began in the 1830’s, when baking soda, or bicarbonate soda, was first introduced to the country.“
Trafalgar.com
Whole Wheat Irish Soda Bread Ingredients
3 cups whole wheat pastry flour – If you can’t find this type of flour, the next best option (and far more widely available) is white whole wheat flour. Not regular white flour. Don’t confuse the two.
1 tsp. baking soda – Make sure this is new or newer baking soda. Old soda won’t do as good of a job.
½ tsp. sea salt – I used pink Himalayan salt, but use whatever fine salt you have. The only salt to avoid is a coarse salt.
1 ½ cups butter milk (plus a little extras reserved) – This is just regular buttermilk. Not low fat or flavored.
How Do You Make Irish Soda Bread From Scratch?
Preheat your oven to 450 degrees F.
Put the flour, baking soda and salt in a bowl and mix well with a whisk.
Make a “well” in the middle of the flour.
Pour your buttermilk into the well.
Combine slightly with a wooden spoon until it get’s too thick to continue mixing with the spoon.
Then you’ve got to get in there with your hands. Go ahead… kneading dough is the fun part of making bread!
Knead until you have a nice firm dough. If your dough is very dry and doesn’t form a nice ball, add a little extra buttermilk, 1 tablespoon at a time. Knead well before adding your next tbsp. to be sure you don’t overdo it.
Form your dough into a round disk that is approximately 1 ½ inches in thickness. Place on an ungreased cookie sheet or pizza pan.
Score your bread with a sharp knife. I cut mine a little deep which is why the bread separated as much as it did in the top photo. But no matter how deep you do or don’t cut it, it will bake well. The idea is to cut it so that you can easily break it into quarters when it’s done.
Bake it in the oven at 450 F. for 15 minute, then reduce the heat to 400 degrees F. and continue baking for 25-30 minutes. If your bread starts to look to brown, loosely place a piece of aluminum foil over the top of it.
Once it’s cooled, store it in a plastic bag. But ya… um… it just didn’t last long enough around here for me to store it. In fact, I cut into it immediately and burned my finger. But man… was that burn worth it!
How To Store Irish Soda Bread
Irish Soda Bread dries out quickly. So always keep it wrapped with plastic wrap, in zipper top bag or in some other type of air-tight container. Fresh soda bread will last about 3-4 days. Keep it in the fridge to be safe.
Can You Freeze Irish Soda Bread?
If you wrap it very well, you can freeze Irish soda bread for up to 3 months.
How To Serve Irish Soda Bread
If it’s been frozen, let it sit on the counter overnight to thaw. Beyond that, slice and serve as:
- Breakfast toast
- Sandwich bread
- As a side to soup
- Cut for a french toast casserole
- Make french toast
- Cut and turn into croutons
- Make and Irish Goody for dessert
More Whole Grain Bread Recipes

Whole Wheat Irish Soda Bread Recipe
Whole Wheat Irish Soda Bread Recipe
Ingredients
- 3 cups whole wheat pastry flour
- 1 tsp. baking soda
- ½ tsp. sea salt
- 1 ½ cups butter milk (plus a little extras reserved)
Instructions
- Preheat your oven to 450 degrees F.
- Put the flour, baking soda and salt in a bowl and mix well with a whisk.
- Make a “well” in the middle of the flour.
- Pour your buttermilk into the well.
- Combine slightly with a wooden spoon until it get’s too thick to continue mixing with the spoon.
- Then you’ve got to get in there with your hands. Go ahead… kneading dough is the fun part of making bread!
- Knead until you have a nice firm dough. If your dough is very dry and doesn’t form a nice ball, add a little extra buttermilk, 1 tablespoon at a time. Knead well before adding your next tbsp. to be sure you don’t overdo it.
- Form your dough into a round disk that is approximately 1 ½ inches in thickness. Place on an ungreased cookie sheet or pizza pan.
- Score your bread with a sharp knife. I cut mine a little deep which is why the bread separated as much as it did in the top photo. But no matter how deep you do or don’t cut it, it will bake well. The idea is to cut it so that you can easily break it into quarters when it’s done.
- Bake it in the oven at 450 F. for 15 minute, then reduce the heat to 400 degrees F. and continue baking for 25-30 minutes. If your bread starts to look to brown, loosely place a piece of aluminum foil over the top of it.
- Once it's cooled, store it in a plastic bag. But ya… um… it just didn't last long enough around here for me to store it.
Notes
Nutrition
This recipe from the Gracious Pantry archives, originally posted 6/14/10.
Forgot to make bread early this morning and found this recipe! Going to use it to make pb sandwiches for my boys!
Arlene – I hope you all enjoy it!
Hi,
I am just curious if you know whether the buttermilk could be substituted with Kefir? I have never seen buttermilk in stores but it sounds like it might be quite similar.
This break looks great, I would love to give it a try 🙂
Thanks
Danny – It’s not quite the same thing, but I think it should work about the same way. It should be fine. Let me know how it turns out!
Do you think you could sub plain Greek yogurt for the buttermilk?
Lori – Maybe if you add a little milk to make it more liquid…
Hi,
I am new to clean eating and find you’re website so easy and helpful! Thank you so much!
I wanted to know, if i cut this recipe in half would my bake times be the same? How do i know when bread is ready to be taken out of the oven?
Thank you!
Newbie – I’ve never tried, so I’m not positive. I would start checking at the 15 minute mark. Poke a knife in and see if it comes out clean. The first round will have to be a trial run.
I am new to clean eating. I have only been doing it a couple of months and am still learning. I am confused – I thought one of the things NOT to eat was whole wheat flour. The only flour I have used is coconut flour. I love your site – it is full of delicious things to try.
Thanks for you help!
Full of Questions – Clean eating is about avoiding processed foods. I think you may be confusing things with Paleo or Gluten Free eating. Any whole grain is fine for clean eating. So you can have brown rice, but not white. You can have whole wheat flour, but not white flour. Here’s a further explanation of the different flours: https://www.thegraciouspantry.com/clean-eating-flour/
Thanks for you help! Yes – I was confused. 🙂
Full of Questions – My pleasure!